Protecting ornamental grasses through freeze–thaw cycles is mostly about stabilizing crowns, improving drainage, and choosing the right winter home: leave hardy clumps in ground with 2–4" loose mulch after soil freezes, heel pots into the soil or group and insulate containers, and avoid early heavy mulching that spurs tender growth. Now check for heaving after thaws, press soil near crowns, and lift mulch gradually in spring; something to contemplate — good drainage beats fancy covers. Keep going for more practical fixes.
Some Key Points
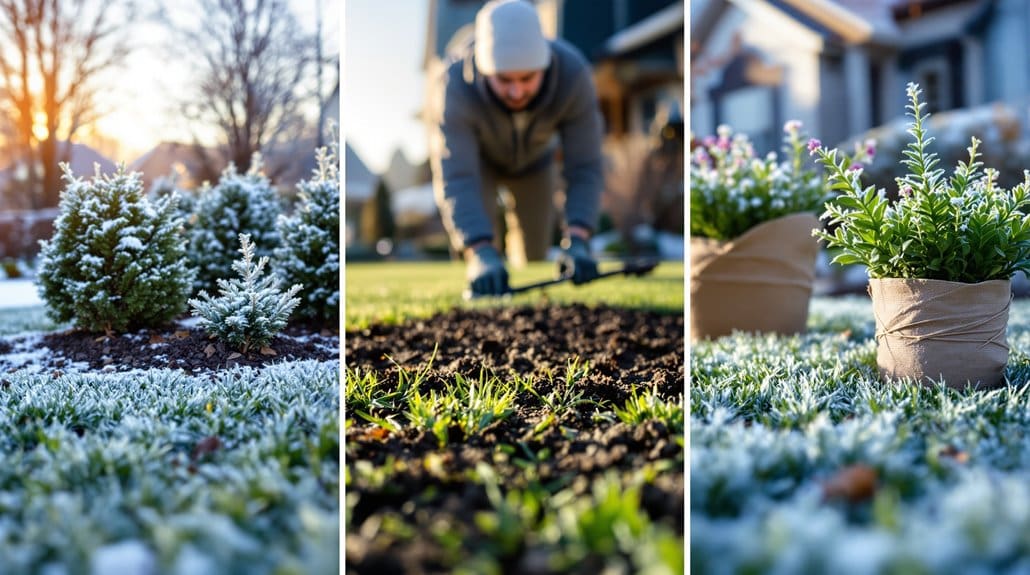
- Mulch crowns with 2–4 inches of shredded leaves or straw only after the ground freezes to buffer freeze–thaw temperature swings.
- Leave grasses standing through winter and tie tall clumps before heavy snow to protect crowns and prevent collapse.
- For containerized specimens, bury or group large pots, use insulated containers, and keep drainage holes clear to avoid water pooling.
- Heel in or mound soil around rootballs and avoid early mulching that traps warmth and encourages vulnerable late growth.
- Use well‑draining, mineral‑rich mixes and plant on slight mounds to prevent meltwater pooling and crown rot.
What Causes Freeze–Thaw Damage in Ornamental Grasses and Pots

When winter throws you a few warm days and then a hard freeze, your ornamental grasses and potted plants pay the price: repeated freezing and thawing heaves the soil, lifts crowns and tears fine roots, and that’s especially bad for shallow-rooted grasses that depend on a tight grip in the soil. Now, freeze–thaw cycles in pots are worse, because limited soil freezes faster, swells and contracts, and lets cold in from all sides, often exposing crowns or snapping roots. Something to ponder: surface thaw with a frozen crown pools meltwater that refreezes and invites rot. Do this, not that — insulate with mulch, snow, or mini covers to slow swings and protect roots. Been there; learn from my sloppy winter mornings. Consider adding lime to adjust pH and improve soil structure for better root resilience soil structure.
Decide: Leave in Ground, Heel In, or Overwinter in Containers?
Decide now how you’ll winter your grasses, because that choice really matters — leave them in the ground if you can, heel pots in as a compromise, or accept the risks of keeping them in containers. Step 1: Do this — leave in ground when your species suits your USDA zone, because soil and snow or 4–6 inches of leaf mulch steady root temps and stop heaving; most hardy varieties thank you. Step 2: Heel in for pots you can’t plant, sink them in a sheltered bed, mound soil or mulch around the rootball, and you’ll cut freeze–thaw stress. Something to weigh: small or root-bound pots are trouble, so divide or repot before hard freezes. If you must keep containers, use big, insulated pots, group or bury them, wrap carefully, and check only occasionally. Consider using a core aerator in fall to relieve soil compaction before heavy winter moisture sets in.
Timing Your Winter Protection: When to Mulch, Cover, or Cut Back
Now, here’s what to do: wait until the ground has frozen before you apply a light 2–4 inch layer of insulating mulch, because I learned the hard way that mulching too early can trap warmth and spur late, vulnerable growth. Something to ponder: hold off on cutting back most grasses until late winter or very early spring when you can see tiny green shoots at the crown, and if you must trim for safety, leave 6–8 inches of dead material and avoid hacking during extreme cold. Finally, if your pots are exposed, cover them before long freezes so they stay consistently frozen and moist, or better yet, heel them into the ground to avoid the freeze–thaw damage containers hate. Consider also choosing the right aeration tool for compacted areas, since proper spike aeration can improve soil drainage and root health.
When To Apply Mulch
Because the ground needs to be reliably cold before you lock in winter protection, you should wait to add mulch until the soil has frozen or is consistently cold—this keeps roots insulated without trapping late-season warmth that can trick plants into growing and then getting zapped by a freeze. Now, apply a light 2–4 inch layer of shredded leaf mulch or straw to insulate roots and reduce freeze-thaw cycles that heave crowns; in low-snow areas mulch once soil is cold to mimic snow. Something to ponder: don’t pile thick or “hot” manures before freeze-up, you’ll regret the late growth. Keep mulch pulled back a few inches from the crown to avoid moisture and rot. Trust this rhythm, you’re protecting your patch like a pro. For homeowners, choosing the right material matters — consider shredded leaf mulch which is effective, readily available, and suits routine lawn care.
Timing For Cutting Back
You’ve just learned when to lock in winter protection with mulch, so here’s what to do about cutting back your grasses: wait. Now, don’t be tempted to tidy up in early cold snaps; wait to cut back until late winter or very early spring, when new green shoots peek at the crown. Do this, not that—leave standing dead foliage to shelter crowns from damaging freeze–thaw cycles and to give structure and wildlife cover. Something to keep in mind: apply a light 2–4 inch leaf mulch after ground freezes, and in pots, protect or bury containers to prevent heaving. Delay heavy pruning until growth resumes. It’s humble advice, learned from mistakes, but it works—trust the pause. Many everyday homeowners find that using comfortable garden kneelers reduces strain when they do perform spring cleanup and maintenance, making the task easier and safer for home gardeners.
How to Mulch and Insulate Crowns to Prevent Heaving and Rot
Mulching the crowns of ornamental grasses is one of those simple tasks that makes a big difference, and if you’ve ever come out in spring to find plants heaved or rotted, this is the fix you’ll thank yourself for. Step 1 — do this: after the ground freezes, apply a 2–4 inch layer of loose, insulating mulch like shredded leaves or straw to buffer against freeze–thaw cycles and keep crowns steady. Now, something to ponder: in low-snow areas, mound extra mulch or build a 6-12 inch ring of burlap or straw to mimic snow’s warmth. Don’t do this: avoid fresh hot manure or mulching too early, which can trap warmth and cause rot. Remove mulch gradually as shoots appear. For long-term lawn and garden health, consider adding perlite benefits to soil mixes to improve drainage and prevent crown rot.
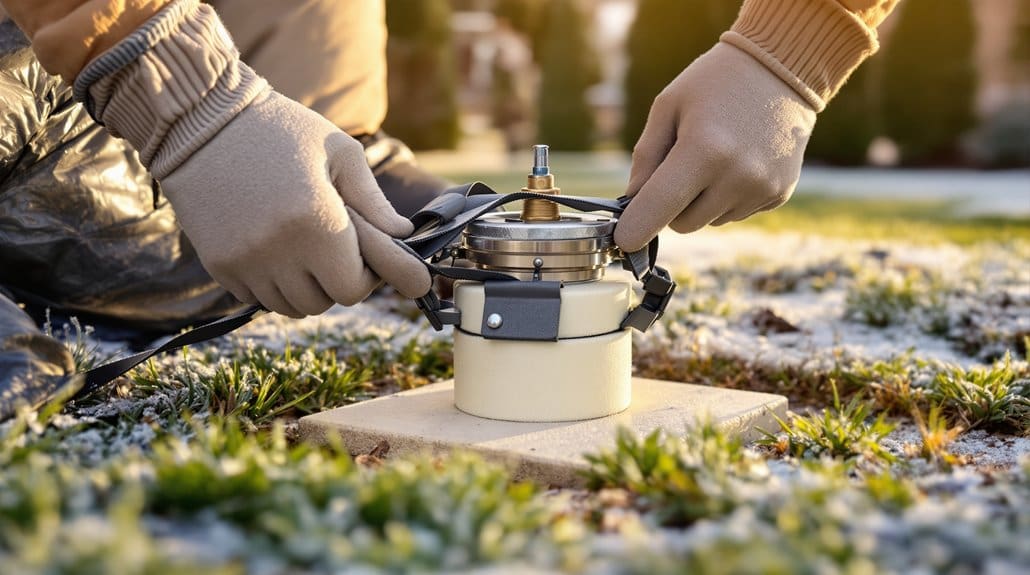
Protecting Containers: Mini Hoop Houses, White Plastic Covers, and Heeling
Now that you’ve got crowns mulched and insulated, don’t forget your container plants — they need protection, too, and they won’t forgive neglect. Step 1: Build mini hoop houses with PVC or metal hoops and white polyethylene, place them before Winter deep freezes, and secure the plastic so water runs off, not pools; you know pooled water and thaw can invite crown rot. Step 2: Add 2–4 inches of shredded leaves or straw under the cover in low-snow areas to mimic insulation and steady soil against harmful freeze–thaw cycles. Now, check covered pots only occasionally — they stay moist enough. Something to keep in mind: if a pot’s root-bound or you’re on the edge of hardiness, heel it into the ground or move it to a bed. Also consider storing unused equipment under protective covers to keep tools and materials ready for seasonal work.
Drainage and Siting Fixes to Reduce Winter Waterlogging and Crown Rot
Now, start by fixing the basics: set pots on feet or a slatted pallet and make sure drainage holes stay clear so meltwater runs away from the crown, not into it, because I’ve certainly watched a few crowns drown when pots sat flat on a saucer. Something worth pondering—plant in a slight mound or raised bed with a coarse, mineral-rich mix and avoid low spots or roof runoff, loosened soil and a small surface swale will keep winter water from pooling. Do this, not that: mulch lightly after the ground has frozen to hold steady moisture, don’t pile on a thick, soggy blanket that traps water around the crown.
Improve Pot Drainage
If you’ve had a pot sit soggy and watch the crown of your grass go mushy, you’re not alone — it’s a common winter mistake, but it’s one you can fix. Step 1: pick pots with multiple drainage holes and sit them on feet or broken clay pots so water runs free, not pooling at the base. Now choose a mix that drains, at least 30–50% coarse sand, grit, or perlite, so it won’t hang on to water during freeze–thaw cycles. Tip the pot slightly on slats or gravel to break capillary wicking and speed drainage when things thaw. Something worth weighing: for fragile clumps, heel the pot into the ground to temper wet–dry swings and protect roots.
Choose Better Siting
Choose better siting to give your grasses the dry feet they need, because even the hardiest clump will sulk — and rot — if you plant it in a low, soggy spot. Step 1: do this — avoid low spots and frost pockets by planting on a 6–12 inch raised bed, berm, or slope so cold air drains away and crowns stay above seasonally saturated soil. Step 2: do this — amend heavy clay with 25–40% coarse sand and well‑rotted compost per cubic yard to boost porosity, reduce pooling that freezes during freeze–thaw cycles, and stop crowns heaving. Something to keep in mind: sink containers into the ground for winter. Don’t mound mulch over the crown; ring it 1–2 inches instead.
Prevent Surface Waterlogging
You’ve already given your grasses a fighting chance by lifting them out of low, soggy spots; now focus on keeping melt and rain from pooling at the crown, because standing water that freezes against the crown is a fast track to rot.
Now, do this: plant on raised beds or mounded soil, four to six inches higher, so crowns sit above frozen-surface pooling, use a well-draining mix with 50–70% mineral matter like coarse sand or grit, and avoid low spots or slope bases where meltwater gathers. Something to ponder: install gravel swales to move runoff away. For pots, set them on feet or bricks so melt drains instead of refreezing at the rim. Mulch 2–3 inches only after ground freezes. Do this, not that—keep crowns dry, not trapped in wet cold.
Pruning and Seedhead Management for Winter Structure and Health
Leaving ornamental grasses standing through winter does more than look pretty — it actually protects the crown from damaging freeze–thaw heaving, so resist the urge to shear everything down in October; instead, wait until you see new basal shoots in late winter or early spring before cutting back. Now, tie tall clumps with twine before heavy snow to prevent collapse, that saved me more than once. Something to ponder: if you want to tidy appearance or reduce self-seeding, snip seed heads in late fall after dispersal, or in early spring before growth, taking care not to nick the basal crown. When you do prune, cut straight across with sharp shears, leave 6–12 inches of old growth, and don’t rush it.
Monitoring and Simple Winter Checks Without Disturbing Plants

Now that you've left the clumps standing through winter and tied up the tall ones, it’s time to do a few simple checks that won’t disturb the plants but will catch problems before they get out of hand. Step 1 — glance at soil and covers every 2–3 weeks; if soil stays frozen yet not waterlogged, your mulch insulation is doing its job against freeze thaw cycles, but soggy thawed soil is a red flag. Step 2 — after big thaws, gently press the soil near crowns to spot heaving, and re-cover if crowns show. Step 3 — watch snow and mulch depth, check covers after storms, and during warm spells above 40°F, resist cutting if tiny green shoots appear, since plants are dormant only partway.
Troubleshooting Common Problems After Thaw Cycles (Heaving, Crown Rot, Dieback)
If repeated freezes and thaws have left your clumps sitting higher than the soil or your pots looking battered, act quickly but gently — the sooner you spot heaving, crown rot, or early dieback, the easier the fix. Step 1 — assess gently: brush back mulch, check crowns for mushy, blackened tissue and collapsed leaf bases; new shoots not emerging is a bad sign. Now stabilize heaved plants by mounding soil around roots or edging heavy pots, don’t yank. Step 2 — treat crown rot: remove dead tissue, divide and replant healthy sections, improve drainage, and avoid overwatering. Something to bear in mind: insulate pots or heel them in, use shredded leaves after freeze, and delay major cleanups until shoots appear.
Some Questions Answered
Will Ornamental Grass Survive a Freeze?
Yes, many ornamental grasses survive a freeze by entering cold dormancy, but success depends on species and root insulation. Now, protect crowns with mulch or snow, don’t remove dead foliage too early, and avoid lifting pots—plant in ground or insulate containers. Something to bear in mind: repeated freeze–thaw cycles cause heaving, so keep soil stable. I’ve lost a clump before, so trust mulch and check crowns in spring.
How to Protect Ornamental Grasses in Winter?
You protect ornamental grasses in winter by insulating crowns: mulch depth should be light (2–4 inches) after the ground freezes, giving root insulation without smothering, not heaping fresh hot manure. Now, leave foliage up, delay late pruning until shoots appear, and for pots, keep roots consistently frozen or use mini-hoops. Something to bear in mind: seeding timing and mistakes I’ve made mean patience wins—don’t cut too early, you’ll thank yourself.
What Do You Cover Outside Plants With During a Freeze?
Cover plants with breathable frost blankets first, then add burlap wraps for wind protection, especially around trunks and stems; don’t use plastic directly on foliage. Now, lift edges during warmer afternoons to avoid trapped moisture, and anchor covers so they won’t blow off. Something to bear in mind: potted plants get a soil mulch and a mini hoop, I’ve learned the hard way that skipping ventilation causes rot, so vent and check daily.
What to Do With Ornamental Grasses Before Winter?
Picture soft, straw-colored plumes bowing in frost; you’ll leave most standing because that dead foliage insulates crowns. Now, do soil preparation with 2–4" shredded leaves or straw around bases, not piled on crowns. Late pruning: only trim in very late winter to 6–8" if you must, tie clumps loosely for tidiness. Something to bear in mind—you can laugh at past over-trimming, but don’t cut to soil before spring.