Start by shutting off the main supply and switch the controller to Off or Rain so it can’t run during a freeze; now open every manual drain and low‑point, or use a regulated blowout (keep PVC under 80 psi), until only dry air appears. Inspect backflow, valves, exposed pipes and valve boxes for cracks, pooled water or stiff diaphragms, replace brittle seals, and check heat tape power. Something to ponder: hidden leaks mimic freeze damage, so if problems persist, call a pro to learn more.
Some Key Points
- Shut off the irrigation controller, disable smart schedules, and switch to Off or Rain/Seasonal to prevent unexpected winter runs.
- Close the system isolation valve and label it off, then open and drain all manual low‑point drains and valve box drains.
- Perform a compressor blowout zone by zone at regulated pressure under 80 psi until only dry air exits each riser.
- Inspect backflow preventer and unions for cracks, pooled water, or pressure drops; repair or replace faulty seals or units.
- Check enclosures, wiring, heat tape, and valve boxes for condensation, frayed heat tape, or standing water and correct insulation or drainage issues.
What to Check First: Confirm Water Is Shut Off and Timers Are Disabled
Start by shutting things down so you don't surprise yourself with a blast of water later — and yes, it happens to people more often than you'd think. Now, go locate and turn off the irrigation system isolation valve, usually in a round underground box with a green lid or inside a garage, and label it so others know it's off. Next, shut off the controller by switching it to Off or Rain/Seasonal, and disable Wi‑Fi or smart scheduling so it won't wake up on a warm day. Close and drain the backflow preventer per the manual, cover it with insulated foam, and bring any hose‑bib timers indoors. Something to contemplate: cycle a test zone briefly after the main is off to confirm no water flows. Consider also checking your irrigation timer for battery health and firmware updates to ensure it stays disabled through cold snaps.
How to Verify the System Was Fully Drained (Manual Drains, Auto Drains, Blowout)
Now check your manual drains by opening each low-point valve or zone drain until you only get air, then close them to make sure no water was left behind — trust me, skipping that step is how I once found a frozen line. Next, confirm your blowout was complete by running the compressor through each zone from highest to lowest at the correct, regulated pressure and watch for only dry dust or air from the sprinklers; if you still see water, run that zone again. Something to ponder: walk every valve box, backflow test cock, and low point for puddles or damp soil, because any leftover water means you didn’t finish, and that’s an easy fix now. For homeowners using portable compressors, make sure you store fuel safely in an approved fuel container and follow the equipment manufacturer's storage and handling recommendations.
Confirm Manual Drain Emptiness
Before you open any cap, take a breath and trust the checklist—leaving a single puddle behind is how winter kills parts you thought were safe. Step 1: Find each manual drain at low points or near zone valves, open it, and watch; clear water or a steady drip means the line needs more draining, so don’t assume it’s done. Now check low spots and service boxes by removing caps and feeling inside with a gloved hand or towel — small puddles matter. Something to keep in mind: re-open backflow test cocks and above-ground valves until dry, insulation can hide trouble. For auto drains, confirm ports aren’t iced or blocked. Do this methodically, you’ll avoid that “I should’ve checked” regret. Also inspect hose connection points and couplings for corrosion or wear, especially hose couplings that homeowners regularly use.
Validate Blowout Completeness
When you finish a compressor blowout, don’t assume “it’s dry” just because the sprinkler heads stopped spitting—you need to verify, zone by zone, that only air came through and no hidden water’s left to freeze. Start at the highest-elevation zone, run each zone with your air compressor until heads discharge clear air, not mist or steady droplets; now check low-point manual drains and auto air-releases, open them, and confirm no steady flow remains. Walk every lateral and peer into valve boxes and backflow assemblies for pooled water or frost. Use a moisture indicator like a paper towel at risers and drain ports—if it stays wet, redo that pass. Document pressures (keep PVC under 80 psi) and note trouble zones for next time. Also consider keeping a small stock of essential sprinkler gear like replacement nozzles and manual drains to confidently handle common winterization issues.
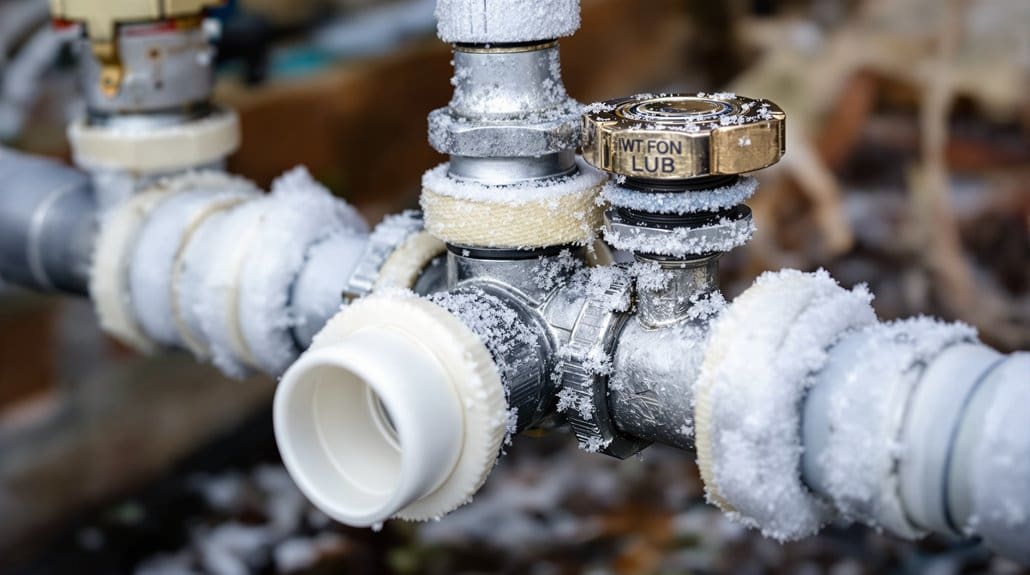
Inspect Exposed Pipes and Fittings for Cracks, Frost Heave, or Ice Damage
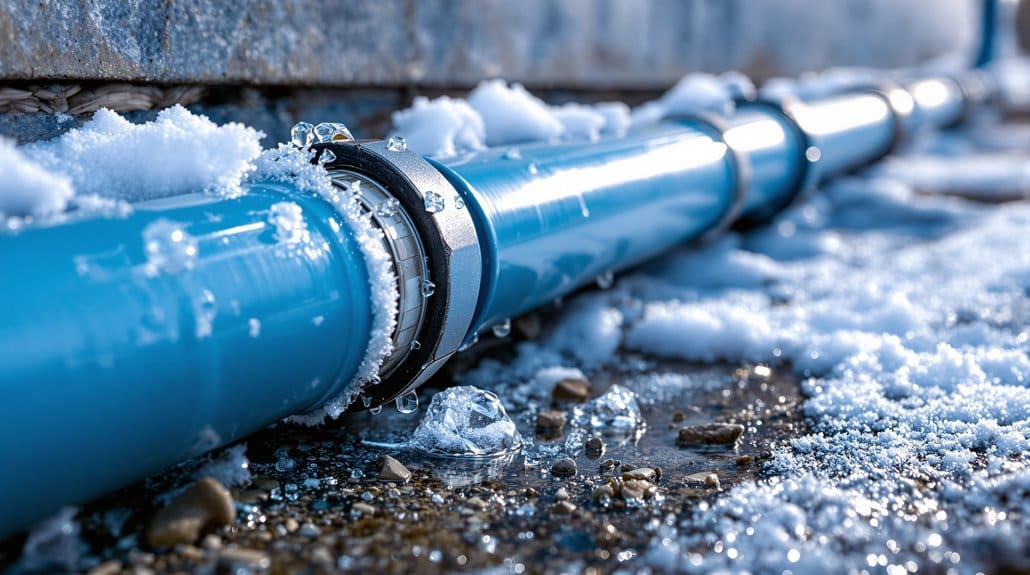
Although the pipes may look fine at a quick glance, take a slow walk around your system and give every exposed PVC and polyethylene line a careful once-over, because hairline cracks, bulges, and hidden frost heave are easy to miss until they spill water everywhere. Now, inspect joints and low spots where water pools, watch for frost heave signs like tilted heads or shifted trenches, and note white frost on valves or meter connections—those are red flags in irrigation systems facing freezing temperatures. Gently probe suspect areas with gloved hands, feeling for soft or brittle spots, and photograph any damage. Something to keep in mind: measure crack lengths and displacement so you can rank repairs and give a pro the facts, not guesses. You’ve got this. Be sure to keep basic repair parts and tools for sprinkler heads on hand so you can address minor issues quickly.
Check Backflow Preventer and Test for Weakened Seals or Slow Leaks
Now check the backflow preventer visually for any wet spots, pooled water, or hairline cracks around unions and test ports, because slow weeps after a freeze are an easy thing to miss and they mean a seal is failing. Next, perform a pressure drop test by isolating the irrigation supply and watching the gauge for more than a few PSI loss over 10–15 minutes, and while you’re at it manually cycle the test valves to listen for hissing or slow leaks that point to internal damage. Something to contemplate: if you find weakened seals, visible cracks, or sustained pressure loss, don’t shrug it off—schedule a professional backflow test and repair or replace the damaged parts before spring activation. Also consider consulting a local supplier for backflow preventer models to ensure you get the right parts and advice for homeowner maintenance.
Visual Seal Inspection
Start by giving the backflow preventer a careful once‑over, because if you’ve ever missed a tiny crack and paid for a flooded bed later, you know the cost of skipping this step; look for pooled water or damp soil around the housing, inspect seals, caps, and insulation for gaps or damage, and feel fittings and unions for dampness or white mineral crust that signals a slow leak. Now, check seals and test‑cock caps for cracks or hardened rubber, because backflow preventers suffer when water freezes and repeats the damage. Something to keep in mind: run a gentle hand‑feel on joints for hidden moisture and skim insulation edges for displacement. Do this, not that—don’t assume visible dryness means everything’s fine. Regularly replace worn gaskets and keep spare parts on hand to avoid preventable failures.
Pressure Drop Testing
Because a slow leak in a backflow preventer can hide for months and still flood a bed come spring, you’ll want to do a pressure drop test the right way so you catch weakened seals or tiny cracks early. Step 1 — isolate the device, pressurize the inlet to normal working pressure (40–60 psi), shut the supply, and watch the gauge; a steady loss over 1–2 psi in 5–10 minutes flags trouble. Now make sure all downstream zones are off and drained so you don’t get false readings from open solenoids. Use a calibrated pressure gauge, record start and finish, and repeat after any tightening. Something to keep in mind: intermittent drops after warming mean call a pro, freeze damage can hide nasty failures.
Repair Or Replace Parts
You’ve already checked for pressure loss, and if that gauge showed even a hint of creep, it’s time to get hands-on with the backflow preventer to figure out whether to repair or replace parts. Step 1: Inspect visually for cracks, brittle rubber seals, or pooling water; cold ages seals, and damp soil nearby often tells you there’s a slow leak. Now manually drain and slowly repressurize while watching test cocks and unions for drips — continuous seepage means weakened seals. Something worth weighing: replace worn rubber components like seat seals and O-rings when leaks exceed a few drops per minute, because small leaks waste water and invite freeze damage. If the body is corroded or won’t hold test pressure, plan full replacement, then retest and monitor 24–48 hours.
Examine Valves and Valve Boxes for Trapped Water or Frozen Components
When the cold months are coming, take a minute to lift each valve box lid and look inside, because a quick visual and feel can save you from a ruined season; you’ll want to spot any standing water, ice, or damp soil right away, since pooled water means the system didn’t drain properly and those valves are at serious risk of freeze damage. Step 1 — open valve box lids, scan for pooled water or ice, and feel components with gloves; cold spots or stiff diaphragms tell you something’s already frozen and can fail. Now clear drains, add gravel if needed, and shut the isolation valve before you drain or replace brittle parts. Something to bear in mind: catching this early saves time, money, and grief.
Inspect Sprinkler Heads and Rotors for Cracks, Misalignment, or Debris
Now take a close look at every sprinkler head and rotor, because small cracks, misalignment, or hidden debris are where problems start and your system pays for it later. Step 1 — visually scan each sprinkler head for hairline cracks, especially around the frost line; those little fractures cause leaks and pressure loss, and yes, I’ve missed them before. Step 2 — check pop-up height and alignment, turf heads should sit about 1–2 inches above grass or mulch, low heads waste water on walkways and harm coverage. Step 3 — remove dirt, ice, or debris from nozzles and screens with a soft brush or compressed air. Now gently run zones, watch rotors for stiff movement, replace any heads showing leaks or freeze-damage.
Look Over Controllers, Sensors, and Electrical Connections for Winter Harm
Take a moment to walk up to the controller and valve boxes, and don’t skip the batteries — cold can quietly drain backups and wipe your schedules, which I’ve learned the embarrassing way; look at the display first, make sure it’s bright and showing the correct time and season program, then check the backup battery and data capacitor monthly in January so you don’t get surprised by a lost program or weird run times. Now, open enclosures and inspect wiring and terminals for cracked insulation or corrosion, because exposed wire in freezing weather can short zones. Check sensors, clean mounts, and confirm analog voltages or switch status, update firmware on smart gear, and guarantee seals and desiccants keep condensation out. Do this, not that: don’t ignore weak RSSI.
Assess Insulation and Covers on Pipes, Backflow, and Above-Ground Parts
You checked the controller, batteries, and sensors, so let’s keep that momentum and look up at the pipes, backflow assemblies, and any exposed above‑ground gear—I've learned the hard way that a perfect program means nothing if a torn cover or loose lid lets ice wreck a valve. Now, inspect foam insulation on Exposed Pipes and backflow preventers, replace torn or compressed covers, and choose closed‑cell foam or rated gear to winterize your irrigation system. Check heat tape, make sure it's powered, thermostatically controlled around 35°F, and replace frayed sections. Something worth considering: waterproof backflow covers and controller enclosures must seal with no pooled water or ice. Re-seat valve box lids, add foam inserts, and after freezes, recheck and document damage for timely repair.
Detect Hidden Issues: Signs of Sub-Surface Leaks, Soil Saturation, or High Bills
Now check your bill first, because an unexplained winter increase or steady overnight flow often points to a hidden leak, and yes, I’ve missed that obvious spike before and kicked myself. Something worth pondering: walk the yard for persistent soggy patches or suddenly lush spots in cold months, feel for warm soil with your hand or a thermometer, and probe valve boxes where pooling gravel can give the game away. If you spot any of those signs, call a pro or shut the system off and investigate right away — don’t wait until repair costs or plant loss climb.
Unexplained Water Bill Increase
If your January bill jumps up and the yard looks oddly soggy or has frozen-over patches while everything else is dry, don’t shrug it off as a billing error — that’s often the sign of a subsurface irrigation leak, and you’ll want to act before the turf and your wallet both take a hit. Now, check for green, lush strips or circular wet spots, especially near valves or buried trenches; those often mark leaking lateral lines. Something to ponder: with the house water off, record the meter over a few hours or overnight, any movement usually means a hidden leak. Watch for frost heave, soft ground, or meter spikes when you slowly pressurize zones in spring. Don’t ignore it; call a pro if excavation looks likely.
Persistent Yard Saturation
When freezing and thawing cycles leave your yard oddly sodden, don’t chalk it up to weather alone — that persistent saturation often hides a subsurface irrigation leak, and you’ll want to act before the ground gets worse and the bill shows up. Step 1 — check the soil: dig a small hole, feel for muddy, cold soil or pooled water at depth while surrounding turf is firm. Now monitor the water meter with household use off; a slow steady tick or leak indicator over 30–60 minutes points to a buried line. Something to ponder: localized lush patches, sinking ground, or frost-free spots betray leaks feeding warmth, sometimes worsened by ice buildup. Do this, not assume. If in doubt, call pros for pressure or acoustic tests.
Sudden Vegetation Decline
You’ve already checked for that soggy spot and watched the meter, so next look at the plants themselves — sudden browning turf, spongy grass, or shrubs that wilt in mild January weather often mean water’s pooling under the root zone and choking them. Now, walk the yard and note dark-green patches or standing water on frozen ground, those are classic leak flags; compare where zones run to the decline, don’t guess. Check the meter for continuous flow or a winter spike in bills, even a few hundred gallons matters. Something to weigh: soft, warm soil underfoot usually means a hidden lateral line or valve leak, and that leak can freeze and cause pipes to crack if you skip winterizing your irrigation system. Shut off and repair.
When to Call a Pro: Complex Repairs, Multi-Zone Blowouts, or Persistent Leaks
Although winterizing your irrigation system can feel like a satisfying DIY weekend project, there are moments you should step back and call a pro, especially when the job gets complex or risky. Step 1 — assess scope: if you have more than four zones, mixed-pressure layouts, or remote valves, professional irrigation help is safer, because multi-zone blowouts need staged, pressure-controlled purges to avoid pipe damage. Now, check symptoms: steady pressure drops, wet spots, or surprise water bills often cause hidden leaks that need detection gear and excavation. Step 2 — critical components: frozen or hard-to-access backflow assemblies and shutoffs require licensed testing and careful draining. Something to keep in mind: lacking a proper compressor or fittings? Don’t guess; call the pro.
Some Questions Answered
Is It Possible to Inspect an Irrigation System in the Winter?
Yes — you can do winter diagnostics by sight, you just won’t run the system. Now, check valve accessibility, open covers carefully, use a flashlight to spot pooled water, cracks, or ice, and feel insulation for dampness. Something to keep in mind: note heaved heads or low spots where water gathers. If you find leaks or weren’t blown out last fall, call a pro. Been there — don’t wait, fix it.
How to Prevent an Irrigation System From Freezing?
You prevent freezing by winterizing techniques: shut the main isolation valve, blow out zones with an air compressor, drain or open automatic drains, and insulate exposed pipes and backflow assemblies with pipe insulation or heat tape. Now remove timers and delicate parts for indoor storage. Something to keep in mind: start high, blow until only mist, and recheck after cold snaps — learned that the hard way, but this routine really saves spring headaches.
What Is the 30 30 Rule for Irrigation?
The 30/30 rule says you winterize when a 30-hour forecast hits 30°F or below for 30 straight hours. Now, shut off water, drain lines, and perform valve operation checks so trapped water won’t freeze and crack pipes. Something to keep in mind: start earlier for shallow systems, we learned that the hard way. Do this, not that—don’t wait—insulate exposed backflow and store removable parts before prolonged cold.
Can Irrigation Prevent Frost Damage?
Yes — irrigation can protect crops, but you’ve got to do it right. Now, use continuous water to keep plant tissue near freezing, think of it like temporary thermal blankets you apply with flow and uniformity; do this, not stop early. Something to bear in mind: many landscape systems fail, so get a pro for adequate pressure and winterized valves. Been there — learned the hard way. Prioritize crop protection, steady application, careful checks.